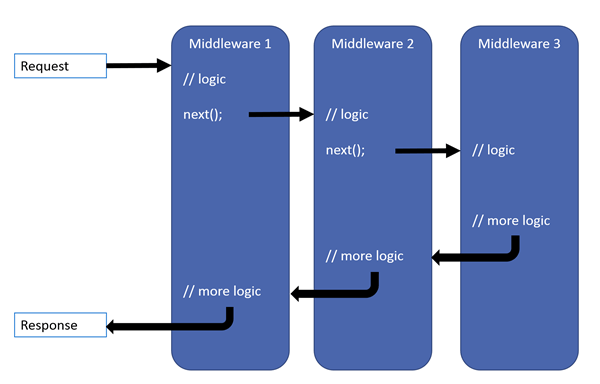
ASP.NET middleware To manage each HTTP request and response, core software components are put together into an application pipeline. Each link in the chain determines whether to short-circuit the pipeline by producing a response directly or process the request and forward it to the subsequent middleware. Every piece of middleware
- Chooses whether to pass the request to the next middleware in the pipeline.
- Can perform work before and after the next middleware in the pipeline.
Request delegates are used to build the request pipeline. The request delegates handle each HTTP request. Request delegates are configured using Run, Map, and Use extension methods. An individual request delegate can be specified inline as an anonymous method (called inline middleware) or defined in a reusable class. These inline anonymous methods or reusable classes are called middleware or middleware components. Each middleware in the request pipeline is responsible for invoking the next middleware in the pipeline or short-circuiting the pipeline. When a middleware short-circuits, it’s called a terminal middleware because it prevents further middleware from processing the request.
Middleware is typically configured in the “Program.cs” file (or Startup.Configure in older templates) using extension methods on the WebApplication (or IApplicationBuilder) instance
- Use(): Chains middleware components together. It can perform actions before and after invoking the next delegate in the pipeline.
- Run(): A terminal middleware delegate that stops the pipeline. It does not have a next parameter and is always the last component to run in its branch of the pipeline.
- Map(): Used to branch the pipeline based on matching the request path. Requests that match the path are routed to a specific branch, which has its own separate middleware pipeline.
- UseWhen(): Conditionally runs a middleware based on a predicate (e.g., checking for a specific query string or header), but the pipeline then rejoins the main sequence.
In .NET Core, middleware components are categorized into two types: terminal and non-terminal.
Terminal middleware is the last component in the middleware pipeline. Its primary role is to generate the response that will be sent back to the client. It can also modify the outgoing response before it’s sent.
Non-terminal middleware refers to any middleware component that isn’t the last one in the pipeline. These middleware components can modify both incoming requests and outgoing responses.
How Middleware Works
The middleware pipeline is bidirectional:
Incoming Request: The request travels through the middleware components in the order they are registered.
Processing: Each component performs its logic and calls await next(context) to pass control to the next component in the pipeline.
Outgoing Response: Once a terminal middleware (like an MVC controller or static file handler) generates a response, the response travels back through the preceding middleware components in reverse order, allowing them to perform post-processing tasks (e.g., logging, adding headers).
Each delegate can perform operations before and after the next delegate. Exception-handling delegates should be called early in the pipeline, so they can catch exceptions that occur in later stages of the pipeline.
Built-in Middleware Examples
ASP.NET Core provides a rich set of built-in middleware for common tasks:
Exception Handling: UseExceptionHandler() and UseDeveloperExceptionPage() for managing errors in production and development environments, respectively.
Static Files: UseStaticFiles() for serving static assets like CSS, images, and JavaScript files.
Routing: UseRouting() and endpoint middleware to match requests to application endpoints (e.g., MVC controllers, Razor Pages, Minimal APIs).
Security: UseAuthentication() and UseAuthorization() to verify user identity and permissions.
HTTPS Redirection: UseHttpsRedirection() to redirect HTTP requests to HTTPS.
Custom Middleware
Developers can create custom middleware to handle application-specific cross-cutting concerns, such as API key authentication, request timing, or correlation ID tracking. By creating custom Middleware components, we can add custom logic, modify requests, and process responses to build robust and feature-rich web applications.
In this article we are demonstrate 3 ways to define custom middleware.
1. With Request Delegates
2. By Convention
3. Factory-Based
Let’s go through each of them and implement in the code.
Adding Middleware With Request Delegates
By calling the Use method on the Web Application instance and providing a lambda method with two arguments. The first argument is the HttpContext and the second argument is the actual next request delegate in the pipeline RequestDelegate.
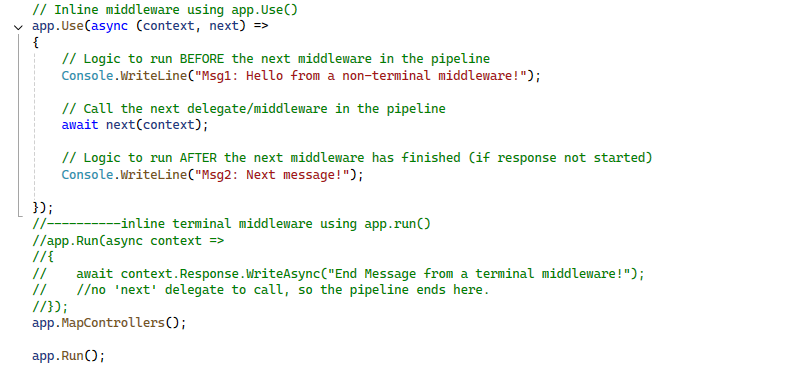
By awaiting the next delegate, you are continuing the request pipeline execution. You can short-circuit the pipeline by not invoking the next delegate. This overload of the Use method is the one suggested by Microsoft.
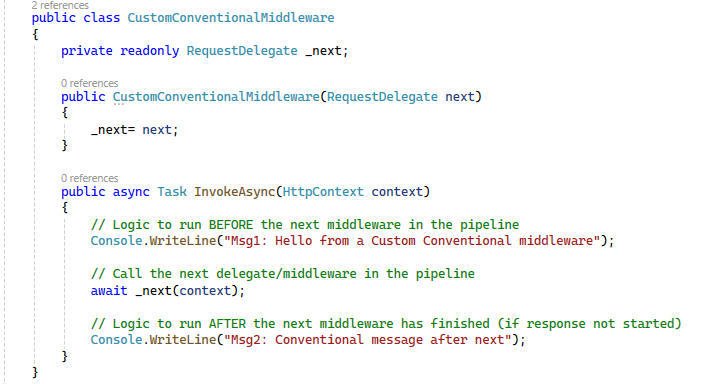
Adding Middleware By Convention
In this approach, we need to create a class that will represent as a middleware. We need to follow below conventions when creating the class so that we can use it as a middleware.
- We need to inject a RequestDelegate in the constructor
- We need to define an InvokeAsync method with an HttpContext argument
- We need to invoke the RequestDelegate and pass it the HttpContext instance
After this, we need to call our middleware in pipeline using “UseMiddleware” method:
//Custom Conventional base Middleware
app.UseMiddleware<CustomConventionalMiddleware>();
Adding Factory-Based Middleware
In this approach again we need to create a class but it going implement the IMiddleware Interface. This interface has only one method i.e. InvokeAsync
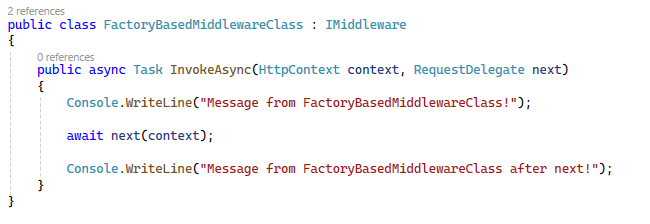
The FactoryMiddleware class will be resolved at runtime from dependency injection and for that we need to register it as a service.
//Register the Middleware in DI Container: The middleware must be registered as a service (typically scoped or transient)
builder.Services.AddTransient<FactoryBasedMiddlewareClass>();
And like previous approach we need to call our middleware in pipeline using “UseMiddleware” method.
//Custom Factory Base Middleware

app.UseMiddleware<FactoryBasedMiddlewareClass>();
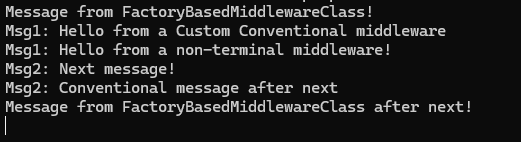
As I have implemented all three approach in one solution and declare in program file which look like as below.
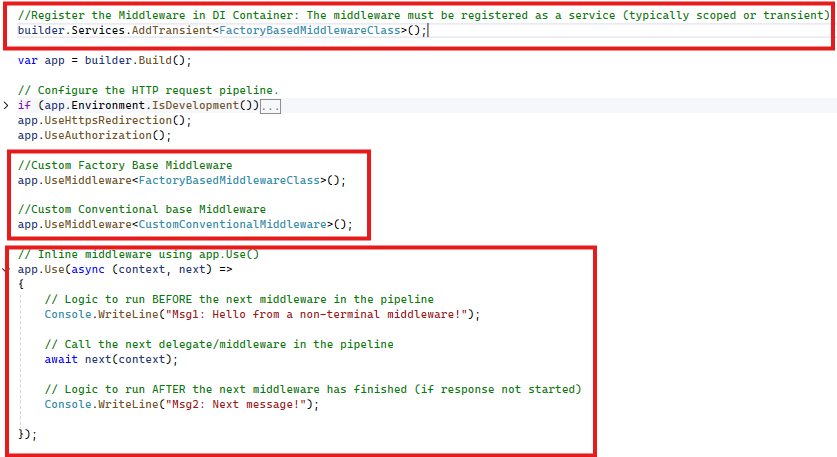
Based on the sequence of the middleware declaration, the executions of respective middleware’s logic occur.
Points to Remember while working with ASP.NET Core Middleware:
- The ASP.NET Core Request Processing Pipeline consists of a sequence of middleware components (custom plus built-in) that are going to be called one after the other. If we want to call the next middleware components then we need to use the next method.
- Each middleware component in ASP.NET Core Application can perform some operations before and after calling the next component using the next method. A middleware component in ASP.NET Core Application can also decide not to call the next middleware component which is called short- circuiting the request pipeline.
- The ASP.NET Core middleware component can access both the incoming request and the outgoing response.
- The Run method in ASP.NET Core is the terminating Middleware Component which means it is not possible to call the next middleware component.
- The order in which the middleware components are registered in the Configure method defines the order in which these middleware components are going to be invoked on requests and the reverse order for the response. So, the order is critical for defining the security, performance, and functionality of the application.
Best and Most Recommended ASP.NET Core 10.0 Hosting
Fortunately, there are a number of dependable and recommended web hosts available that can help you gain control of your website’s performance and improve your ASP.NET Core 10.0 web ranking. HostForLIFE.eu is highly recommended. In Europe, HostForLIFE.eu is the most popular option for first-time web hosts searching for an affordable plan. Their standard price begins at only €3.49 per month. Customers are permitted to choose quarterly and annual plans based on their preferences. HostForLIFE.eu guarantees “No Hidden Fees” and an industry-leading ’30 Days Cash Back’ policy. Customers who terminate their service within the first thirty days are eligible for a full refund.
By providing reseller hosting accounts, HostForLIFE.eu also gives its consumers the chance to generate income. You can purchase their reseller hosting account, host an unlimited number of websites on it, and even sell some of your hosting space to others. This is one of the most effective methods for making money online. They will take care of all your customers’ hosting needs, so you do not need to fret about hosting-related matters.