
Fluent Hybernate: What Is It?
The well-known Object-Relational Mapping (ORM) framework NHibernate, which is frequently utilized in enterprise applications for database interfaces, is extended by Fluent NHibernate. Developers may use a fluent API to generate mappings using Fluent NHibernate, doing away with the requirement for laborious XML setup files.
Developers can deal with database tables in an object-oriented way while abstracting SQL interactions when Fluent NHibernate is used in conjunction with NHibernate.
Benefits of Fluent NHibernate
Fluent NHibernate offers several advantages
- Simplified Configuration: It replaces XML-based mapping configurations with type-safe, fluent code, making it easier to understand and maintain.
- Code-First Development: Developers can define mappings directly from their domain models without relying on existing database schemas.
- Type Safety: Mapping is done in code, which ensures compile-time checks and reduces runtime errors.
- Supports Complex Relationships: Fluent NHibernate handles object relationships like inheritance and associations (one-to-many, many-to-many) with ease.
- Quick Prototyping: It enables rapid development by automatically generating tables using mappings when needed.
Development Steps
Let us now dive into the actual setup and implementation.
Step 1. Setting Up the Database Table
First, create a Users table in your database that we will use in our application.
Step 2. Creating the ASP.NET Core Web API Project
- Open Visual Studio.
- Navigate to File → New → Project, and select ASP.NET Core Web API as your project template.
- Configure the project details and click Create.
Step 3. Installing NHibernate NuGet Package
- Right-click on the solution in Solution Explorer.
- Select Manage NuGet Packages.
- Search for NHibernate and install the latest version.
- Repeat the process to install Fluent NHibernate.
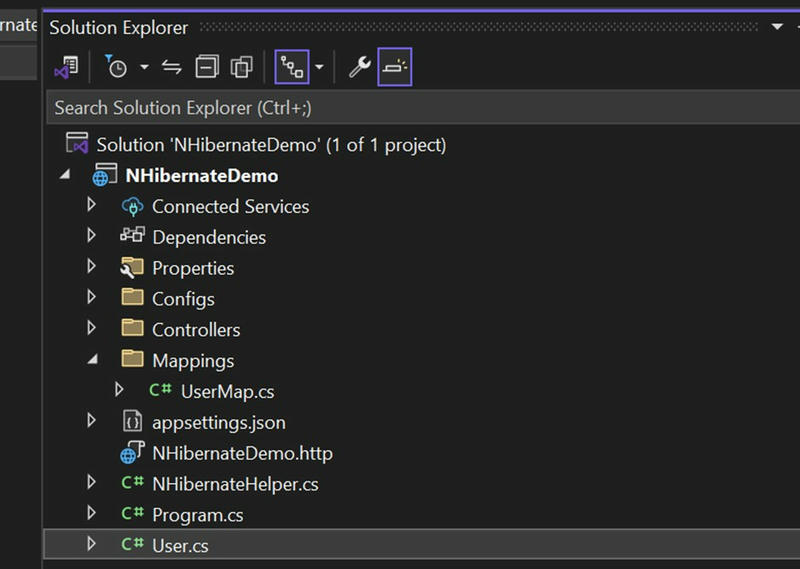
Step 4. Setting Up the Project Structure
- Add a new folder named Mappings to the project.
- Create two files inside the project:
- User.cs: Domain model representing the Users table.
- UserMap.cs: Mapping file for Fluent NHibernate.
- NHibernateHelper.cs file for database session
Here’s how your solution folder should look:
Step 5. Configuring Domain Models and Mappings
User.cs (Domain Model)
Define the User class, which corresponds to the Users table.
UserMap.cs (Mapping Configuration)
Map the User class to the Users table using Fluent NHibernate.
Step 6. Setting Up NHibernate Helper
Create a helper class to configure NHibernate and manage sessions.
NHibernateHelper.cs
Step 7. Configuring the Database Connection
Add a connection string to appsettings.json for NHibernate to connect to the database.
Step 8. Configuring Fluent NHibernate in Program.cs
Set up Fluent NHibernate in Program.cs for dependency injection and database schema creation.
Step 9. Building the UsersController
Create a new controller named UsersController.cs to handle API endpoints.
UsersController.cs
Step 10. Running the Application
1. Run the project in Visual Studio.
2. Access the API endpoints using Swagger UI or Postman.
- Use the POST endpoint (
api/users) to add a user to the database. - Use the GET endpoint (
api/users) to retrieve the list of users.
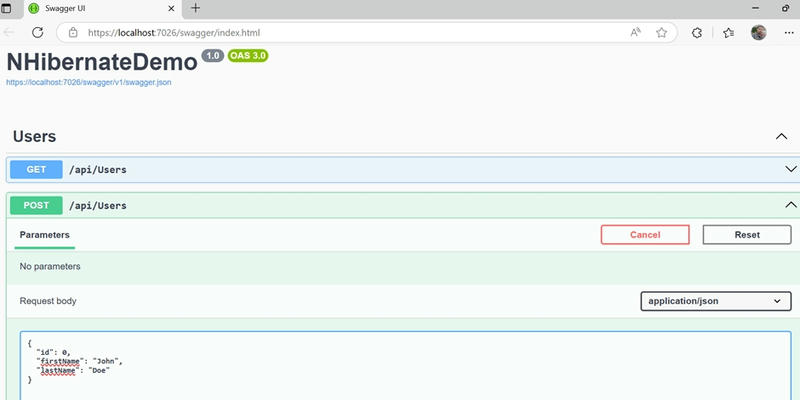
Click on the execute button below and see the output.
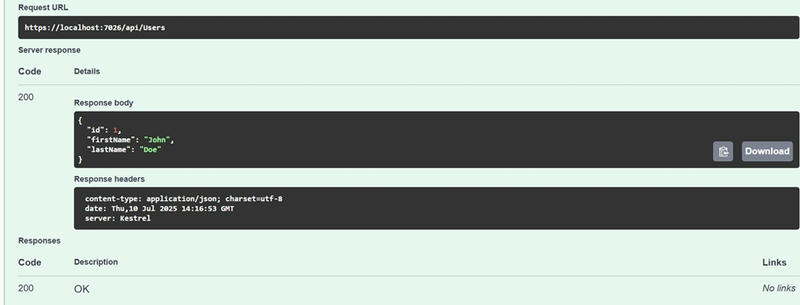
Now you can query the database and see the output.
Conclusion
In this article, we’ve implemented basic CRUD functionality using Fluent NHibernate with ASP.NET Core Web API. While we’ve demonstrated only GET and POST Methods, you can follow the same pattern for update (PUT) and delete (DELETE) operations.
This tutorial provides a solid foundation for building a robust backend API. Remember:
- Fluent NHibernate allows for easier mapping using code-first principles.
- Automating schema creation is suitable for prototypes but should be handled cautiously in production environments.
Thank you for reading! If you have any questions, feel free to drop a comment. Happy coding!
Best and Most Recommended ASP.NET Core 10.0 Hosting
Fortunately, there are a number of dependable and recommended web hosts available that can help you gain control of your website’s performance and improve your ASP.NET Core 10.0 web ranking. HostForLIFE.eu is highly recommended. In Europe, HostForLIFE.eu is the most popular option for first-time web hosts searching for an affordable plan. Their standard price begins at only €3.49 per month. Customers are permitted to choose quarterly and annual plans based on their preferences. HostForLIFE.eu guarantees “No Hidden Fees” and an industry-leading ’30 Days Cash Back’ policy. Customers who terminate their service within the first thirty days are eligible for a full refund.
By providing reseller hosting accounts, HostForLIFE.eu also gives its consumers the chance to generate income. You can purchase their reseller hosting account, host an unlimited number of websites on it, and even sell some of your hosting space to others. This is one of the most effective methods for making money online. They will take care of all your customers’ hosting needs, so you do not need to fret about hosting-related matters.