In this post, we’ll look at using Node.js to invoke stored procedures and MySQL to build a login stored procedure. For the purpose of enclosing complex queries inside the database, stored procedures are named collections of SQL statements. We develop a login stored procedure named “CheckPassword,” which verifies user credentials when a user logs in by determining whether the supplied password matches the user’s saved password. We increase the security and maintainability of the code by employing stored procedures, preventing the direct exposure of sensitive data. This tutorial walks you through creating a Node.js project, a MySQL database and table, and a login process. For your Node.js applications, you may create a strong and reusable login system using this method, assuring secure user authentication.
Steps for creating a project in Node.js
Step 1. Setting up a Node.js project
Use the previous article for setting up Node.js, “How to upload file in Node.js,” and creating a table in MySQL. In this article, we mentioned the necessary commands for uploading files in Node.js and creating tables in Mysql.
Step 2. Create a Database and table
Suppose we have created a schema named “mydb” within this database. In this schema, we have created a table named “employee” with columns named “empid,” “empname,” and “emppassword.” If you are unsure how to create a schema and table, we have attached a link to an article providing a detailed explanation (DDL, DML, and DCL in MySQL).
Step 3. Creating login stored procedure in MYSQL
In MySQL, a named series of SQL statements used to validate user credentials during the login process is known as a stored procedure. The username and password are normally input parameters for the operation. The database is then searched for a matching username, and a check is made to see if the supplied password matches the user’s stored password. The process may produce a success code or the user’s unique identification if the login is successful. An error code indicating that the user does not exist may be returned if the username cannot be located.
It might produce an error code signifying an incorrect password if the password does not match. By preventing the direct disclosure of login information in application code, stored procedures help wrap the login logic in the database, making it more reusable and possibly more secure.
CREATE DEFINER=`root`@`localhost` PROCEDURE `CheckPassword`(
IN empid_in INT(8),
IN emppassword_in VARCHAR(45),
OUT yes_no CHAR(1)
)
BEGIN
IF EXISTS(SELECT * FROM employee WHERE empid = empid_in AND emppassword = emppassword_in) THEN
SET yes_no = ‘1’; — Password found (successful login)
ELSE
SET yes_no = ‘0’; — Password not found (incorrect login)
END IF;
END
Explanation
Employee ID, password, and output parameter yes_no are the three parameters that are passed into the CheckPassword stored procedure. This procedure’s goal is to see if the empid_in and emppassword_in inputs match any records in the employee table. The output parameter yes_no is set to ‘1’, and the login attempt is successful if a match is discovered. Otherwise, the yes_no parameter is set to ‘0’ if no match is discovered, denoting an unsuccessful login attempt.
This stored procedure can be used to check user login information against database-stored information. This logic is contained within a procedure, improving the code’s security, maintainability, and reuse. The procedure can operate with various employee IDs and passwords on a dynamic basis thanks to the use of parameters. The procedure can be invoked from an application, and depending on the value of the output parameter yes_no, the right actions, such as giving access or showing an error message, can be taken.
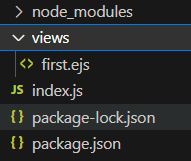
Step 4. Project Structure
When successfully setting up a Node.js Project, it creates some folders such as node modules, package-lock.json, and package.json, but we need to create some files below the image attached. You want to create a ‘views’ folder. This folder has ejs or HTML files, and one more file is needed to create, which is ‘index.js’.
index.js
Explanation
This Node.js application handles user login functionality using Express.js and MySQL. The program configures a server and creates a link to the MySQL database. It uses body-parser middleware to parse incoming data and EJS as the view engine to render a login page. The server receives the entered ID and password when a user submits the login form. The given ID and password are then passed as inputs to a MySQL-stored process called CheckPassword, which is then called by the server. The stored method determines whether the credentials match any employee table record. It gives the Node.js application an output parameter (‘1’ on success, ‘0’ on failure).
The value of the output parameter is then fetched by the Node.js application using another query. The server responds to the client with “Login successful” or “Login failed” messages depending on the output. By utilizing MySQL stored procedures to handle the actual password verification logic in the database, this configuration enables secure login validation while protecting sensitive data and giving the user a clear result.
first.ejs
Explanation
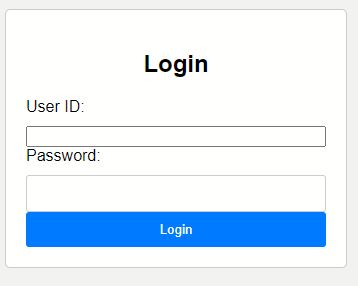
An easy HTML login form for user authentication is provided here. It comprises a container in the middle that has fields for the user ID and password. Each input field on the form is labeled with the information that should be entered. For secure input, the user ID field is of type “number,” while the password field is of type “password”. A POST request is sent to the “/login” endpoint when the user submits the form. The form is aesthetically appealing and responsive across a range of devices thanks to its simple layout. The form input will be transferred to the server for additional processing and validation after successful submission.
Output
Best Windows Hosting for Node.js Recommendation
 HostForLIFEASP.NET guarantees the highest quality product, top security, and unshakeable reliability. They carefully chose high-quality servers, networking, and infrastructure equipment to ensure the utmost reliability. HostForLIFEASP.NET ensures complete refund inside the first 30 days and prorate money back again after that time. Their top priority to deliver the ultimate customer experience, and they strongly believe that you’ll love their service - so much so that if for any reason you’re unhappy in your first 30 days as a customer, you’re more than welcome to request your money back.
Their regular price starts at € 3.00/month only. Customers are allowed to decide on quarterly and annual plan supported their own desires. HostForLIFEASP.NET guarantees “No Hidden Fees” and industry leading ‘30 Days Cash Back’, folks might ask for a full refund if they cancel the service at intervals the first thirty days.
HostForLIFEASP.NET also give their customers an opportunity to create some cash by providing reseller hosting accounts. you'll purchase their reseller hosting account, host unlimited websites thereon and even have the prospect to sell a number of your hosting area to others. This could be one amongst the best ways that of creating some cash on-line. You are doing not have to be compelled to worry concerning hosting stuff as they'll beware of all the hosting desires of your shoppers.
 UKWindowsHostASP.NET spares no efforts to provide high-quality Windows and Linux hosting services to webmasters ranging from business owners to individuals who look forward to full functionality that can be realized via a small budget. To be exact, it launches Developer Plan with a 30 days money back guarantee included. The price starts at £7.00/mo regularly.
UKWindowsHostASP.NET is a windows-based hosting service provider. They offer the most reliable and stable web hosting infrastructure on the net with great features, fast and secure servers.
They integrate and centralize everything--from the systems to the control panel software to the process of buying a domain name. For them, that means they can innovate literally everywhere. They've put the guys who develop the software and the admins who watch over the server right next to the 24-hour support team, so they all learn from each other.
![]() DiscountService.com.au guarantees the highest top quality solution, prime safety, and unshakeable reliability. We carefully chose high-quality servers, networking, and infrastructure gear to make sure the utmost reliability.
DiscountService.com.au guarantees the highest top quality solution, prime safety, and unshakeable reliability. We carefully chose high-quality servers, networking, and infrastructure gear to make sure the utmost reliability.
They focus on offering cost-effective Windows shared hosting. That’s all they do and which is all they'll ever do. Their new Windows 2008 / Windows 2012 hosting platform is excellent for the ASP.NET hosting needs and in case you'll need support on Windows 2003 Hosting Platform, they still support it!
With their completely support on Microsoft Windows and ASP.NET, they're the top option to host your web hosting. The following are a few of the causes why clients choose them as web hosting provider:
World Class Control Panel
They use Globe Class Plesk Control Panel that help one-click installation.
Quickly and Safe Server
The minimal specs of their servers involves Intel Xeon Dual Core Processor, RAID-10 protected hard disk space with minimum eight GB RAM. You dont want to worry regarding the speed of one's web site.
Soon after reading this Node.js v19.3.0 hosting post, we believe you need to received a clear thought about which web host could be your very best decision for Node.js v19.3.0 application. Certainly, our editors often extremely suggest HostForLIFEASP.NET options as your 1st Node.js v19.3.0 hosting option. Should you do not need to pick HostForLIFEASP.NET service, then you might verify with UKWindowsHostASP.NET which can be also extremely excellent at Node.js v19.3.0 technologies.
Ultimately, if you are nonetheless obtaining difficulty in deciding on a appropriate Windows hosting provider for Node.js v19.3.0, just really feel cost-free to contact us anytime as you like and our editors will reply you back as soon as possible.