The fundamental element of file uploading in contemporary web development makes it possible for users to share and store various types of content. Thanks to Node.js’s efficient and event-driven architecture, file uploads can be managed in a stable environment. This article will cover the administration of form submissions, the processing of file uploads, and the saving of files on the server, among other aspects of file uploading in Node.js. This tutorial will guide you through adding file-uploading support to your Node.js applications, regardless of your level of experience as a developer.
Setting Up a Node.js Project
Here we discuss how to set up a Node.js project.
Installing Node.js
- Download the correct Node.js version for your operating system by going to the official Node.js website (https://nodejs.org).
- To install Node.js on your computer, launch the installer and adhere to the directions.
- By launching a terminal or command prompt and entering node -v, you may confirm the installation. The Node.js version should be displayed on the terminal.
Initializing a Node.js project with npm
- For your project, either create a new directory or go to an existing one.
- Go to the project directory in a terminal or command prompt after opening it.
- To start a fresh Node.js project, execute the command below.
- Your project’s name, version, description, entrance point, and other details will be requested of you. Pressing enter will allow you to enter new settings or accept the defaults.
- The package.json file, which contains the metadata and dependencies for your project, will be created by npm and placed in your project directory after you have provided the appropriate information.
Installing required dependencies
- We will require some more packages in order to manage file uploading in Node.js. Express is a well-liked package that offers a simple and adaptable web framework for Node.js
- Open a command window or a terminal in the project directory.
- Install Express and save it as a Project Dependency by running the following command
- To install the EJS (Embedded JavaScript) package in your Node.js project, you can run the following command in your command window or terminal.
- Additionally, we’ll make use of the middleware package multer, which manages data from multipart forms, including file uploads. Run the following command to install it.
- With the help of these instructions, you can download the necessary packages and store them in your package.json file as dependencies.
Project Structure
After a successful project setup, we need to add some folders below the image of the project structure.
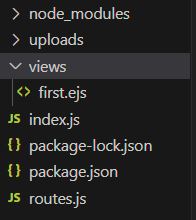
In this file structure, node_modules, package-lock.json, and package.json these files is created while you set up a project. We created index.js, routes.js, and views folder. Below attached all files used in this project.
index.js
This code configures a fundamental Express server with file upload capabilities. The required modules, including Express, path, and multer, are imported. It also sets the views directory and configures the server’s view engine to use EJS templates. To process incoming requests, the routes module is necessary and employed as middleware. Multer is set up to manage file uploads, with the destination directory and filename being specified. When the server first starts up, it outputs a message and listens on port 3000. The ‘/upload’ route accepts file uploads, saves them to the designated location, and then responds with an indication that the upload was successful.
routes.js
Using the Express Router module, this code configures a router. Express.Router() is used to build a new instance of the Router after importing the “express” module. A GET request to the root URL (“/”) will be handled by the router. The callback function, which renders the ‘first’ view using res.render(‘first’), is called when this request is received.
The ‘first’ EJS template is rendered using the res.render() method and is a dynamic HTML file that can be filled with data before being sent as a response. The router is finally exported so that it can be mounted as middleware in the main application file or used by other modules. In an Express application, this enables the routes to be organized and modularized.
first.ejs
In this file structure, node_modules, package-lock.json, and package.json these files is created while you set up a project. We created index.js, routes.js, and views folder. Below attached all files used in this project.
index.js
Explanation
This code configures a fundamental Express server with file upload capabilities. The required modules, including Express, path, and multer, are imported. It also sets the views directory and configures the server’s view engine to use EJS templates. To process incoming requests, the routes module is necessary and employed as middleware. Multer is set up to manage file uploads, with the destination directory and filename being specified. When the server first starts up, it outputs a message and listens on port 3000. The ‘/upload’ route accepts file uploads, saves them to the designated location, and then responds with an indication that the upload was successful.
routes.js
Using the Express Router module, this code configures a router. Express.Router() is used to build a new instance of the Router after importing the “express” module. A GET request to the root URL (“/”) will be handled by the router. The callback function, which renders the ‘first’ view using res.render(‘first’), is called when this request is received.
The ‘first’ EJS template is rendered using the res.render() method and is a dynamic HTML file that can be filled with data before being sent as a response. The router is finally exported so that it can be mounted as middleware in the main application file or used by other modules. In an Express application, this enables the routes to be organized and modularized.
first.ejs
Output
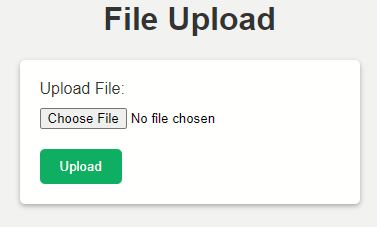
To render an HTML form for file uploads, an EJS (Embedded JavaScript) template file called “upload.ejs” is utilized. A title, style specifications, and a form element are all parts of the HTML structure. The form features a “Upload File” labeled file input field and a submit button. The uploaded file is included in a POST request to the “/upload” endpoint that is sent when the form is submitted.
The styling in the included CSS determines the font family, margin, padding, background color, and box shadow of the form. The submit button’s background color is green, and the form’s elements are styled with the proper spacing. A clean, basic, and centered arrangement characterizes the entire design.
Best Windows Hosting for Node.js Recommendation
 HostForLIFEASP.NET guarantees the highest quality product, top security, and unshakeable reliability. They carefully chose high-quality servers, networking, and infrastructure equipment to ensure the utmost reliability. HostForLIFEASP.NET ensures complete refund inside the first 30 days and prorate money back again after that time. Their top priority to deliver the ultimate customer experience, and they strongly believe that you’ll love their service - so much so that if for any reason you’re unhappy in your first 30 days as a customer, you’re more than welcome to request your money back.
Their regular price starts at € 3.00/month only. Customers are allowed to decide on quarterly and annual plan supported their own desires. HostForLIFEASP.NET guarantees “No Hidden Fees” and industry leading ‘30 Days Cash Back’, folks might ask for a full refund if they cancel the service at intervals the first thirty days.
HostForLIFEASP.NET also give their customers an opportunity to create some cash by providing reseller hosting accounts. you'll purchase their reseller hosting account, host unlimited websites thereon and even have the prospect to sell a number of your hosting area to others. This could be one amongst the best ways that of creating some cash on-line. You are doing not have to be compelled to worry concerning hosting stuff as they'll beware of all the hosting desires of your shoppers.
 UKWindowsHostASP.NET spares no efforts to provide high-quality Windows and Linux hosting services to webmasters ranging from business owners to individuals who look forward to full functionality that can be realized via a small budget. To be exact, it launches Developer Plan with a 30 days money back guarantee included. The price starts at £7.00/mo regularly.
UKWindowsHostASP.NET is a windows-based hosting service provider. They offer the most reliable and stable web hosting infrastructure on the net with great features, fast and secure servers.
They integrate and centralize everything--from the systems to the control panel software to the process of buying a domain name. For them, that means they can innovate literally everywhere. They've put the guys who develop the software and the admins who watch over the server right next to the 24-hour support team, so they all learn from each other.
![]() DiscountService.com.au guarantees the highest top quality solution, prime safety, and unshakeable reliability. We carefully chose high-quality servers, networking, and infrastructure gear to make sure the utmost reliability.
DiscountService.com.au guarantees the highest top quality solution, prime safety, and unshakeable reliability. We carefully chose high-quality servers, networking, and infrastructure gear to make sure the utmost reliability.
They focus on offering cost-effective Windows shared hosting. That’s all they do and which is all they'll ever do. Their new Windows 2008 / Windows 2012 hosting platform is excellent for the ASP.NET hosting needs and in case you'll need support on Windows 2003 Hosting Platform, they still support it!
With their completely support on Microsoft Windows and ASP.NET, they're the top option to host your web hosting. The following are a few of the causes why clients choose them as web hosting provider:
World Class Control Panel
They use Globe Class Plesk Control Panel that help one-click installation.
Quickly and Safe Server
The minimal specs of their servers involves Intel Xeon Dual Core Processor, RAID-10 protected hard disk space with minimum eight GB RAM. You dont want to worry regarding the speed of one's web site.
Soon after reading this Node.js v19.3.0 hosting post, we believe you need to received a clear thought about which web host could be your very best decision for Node.js v19.3.0 application. Certainly, our editors often extremely suggest HostForLIFEASP.NET options as your 1st Node.js v19.3.0 hosting option. Should you do not need to pick HostForLIFEASP.NET service, then you might verify with UKWindowsHostASP.NET which can be also extremely excellent at Node.js v19.3.0 technologies.
Ultimately, if you are nonetheless obtaining difficulty in deciding on a appropriate Windows hosting provider for Node.js v19.3.0, just really feel cost-free to contact us anytime as you like and our editors will reply you back as soon as possible.